You are here
NiFpga Toolbox
Tue, 2012-01-24 10:34 — Péter Fiala
 Assume you have implemented an FPGA VI (Virtual Instrument) called
  The corresponding HOST application simpleHOST.vi is shown above. The application makes connection with the FPGA at the URL rio://152/66/249/36/RIO and loads the FPGA bitfile to the FPGA hardware. Next, the FPGA controls are set to
Introduction:
The NiFpga toolbox provides a Matlab interface to National Instruments FPGA (NI FPGA). The Matlab interface is based on the recently released NI-FPGA C-API and can be used with any NI FPGA hardware running NI-RIO.
Using the toolbox, NI FPGA applications can directly be controlled from Matlab instead of LabView. The toolbox provides the full functionality of the LabView FPGA Interface Panel, including indicator and control read/write commands, interrupt handling and DMA FIFO operations.
Installation:
You can install the NiFpga Toolbox as follows:
- Copy the contents of the installation package into the installation directory.
- Make sure you have a C++ compiler installed and configured for use with Matlab mex. C++ compilers can be configured in Matlab using the command
>> mex -setup - Open Matlab, enter the installation directory and run
>> NiFpga_install
As a result, Matlab generates the executableNiFpga.mexw32in the installation directory (the extension may differ according to your operating system and hardware architecture, refer to the Matlab functionmexextfor details).
Tutorials:
The LabView FPGA application
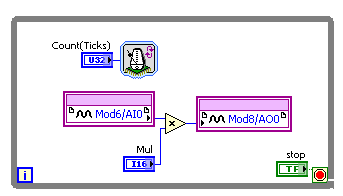
Assume you have implemented an FPGA VI (Virtual Instrument) called simpleFPGA.vi, shown above. This VI uses an analogue input (AI) module for signal acquisition and an analogue output (AO) for signal output. The input module is placed in Mod6 and the output module is placed in Mod8 of the used NI hardware. Both input and output modules are configured to work with raw I16 type data. The VI reads a sample from the 0-th channel of the input module, multiplies its value by an integer stored in the control Mul, and writes the result to the 0-th channel of the output module. The read and write operations are repeated in a while loop timed by the control Count(Ticks), until the boolean control stop is set to true.
The LabView HOST application
The corresponding HOST application simpleHOST.vi is shown above. The application makes connection with the FPGA at the URL rio://152/66/249/36/RIO and loads the FPGA bitfile to the FPGA hardware. Next, the FPGA controls are set to Count(Ticks) = 1000, Mul = 2 and stop = false. Following this step, the FPGA execution is started, and after the user sets the stop control to true, the FPGA variable stop is set to true, and the FPGA program is closed.
Translate to Matlab
This HOST application can be translated to Matlab as follows.- First, the C header of the
simpleFPGA.vineeds to be generated by the C API. This is performed by right clicking the vi in the project explorer and calling the C API Generator, as shown below: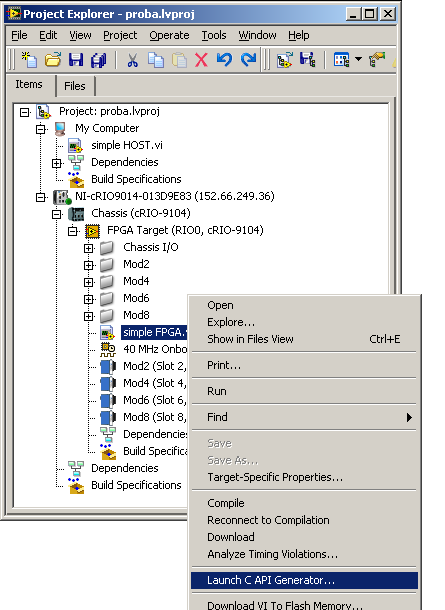 The C API Generator generates the files
NiFpga_simpleFPGA.lvbitx(NI FPGA bitfile)NiFpga_simpleFPGA.h(C language header file)
FPGA Bitfilesin your LabView project directory. - Copy the two generated files into a destination directory (e.g.
C:/FirstApp/), open Matlab and enter the destination directory. - Run the
NiFpgatoolbox using the toolbox function>> NiFpga2Matlab('simpleFPGA', 'MyClass');This command generates two Matlab classes based on the C language header fileNiFpga_simpleFPGA.h. These classes areCMyClassandCsimpleFPGA, the source codes of which can be found inCMyClass.mandCsimpleFPGA.min the destination directory.
simpleHOST.m can be implemented as below:
MyClass = CMyClass('rio://152.66.249.36/RIO0');
C = MyClass.simpleFPGA;
C.open('norun');
C.CountTicks = 1000;
C.stop = false;
C.Mul = 2;
C.run('nowait');
pause;
C.stop = true;
C.close;
Administrator:
- Log in to post comments